Understanding WebSocket: The Foundation of Real-time Web
- 4 mins readsetInterval(function() {
$.get('/v/abc-123/requests')
.then(function(data) {
updateRequestsList(data)
})
}, 5000)
Remember that line of code? Ahh jQuery, the good old days 😄
Back in the day, this was how I made my first “real-time” web application. Every 5 seconds, jQuery would ask the server, “Hey, do you have any new data?” We called it polling, and honestly, at that time, it felt like magic! The page would update without refreshing - well, kind of.
The problems started when more users began using the app. The server got bombarded with requests every 5 seconds, and users complained that updates were slow. Some even missed important messages because they arrived between polling intervals.
That’s when I learned about WebSocket. It completely changed how I build real-time features, and today I want to share what I learned before we add it to WebhookDump. Trust me - it’s way better than our old jQuery polling days!
How WebSocket Makes Things Better
WebSocket fixes this problem in a clever way. Instead of asking for updates over and over, your browser and the server create a connection that stays open, like a phone call. Once connected, they can share information anytime they want.
I like to explain it to my friends like this: Imagine you’re waiting for a package. The old way is like calling the delivery company every few minutes to ask, “Is my package here yet?” WebSocket is like having the delivery person call you the moment your package arrives.
What Actually Happens Behind the Scene?
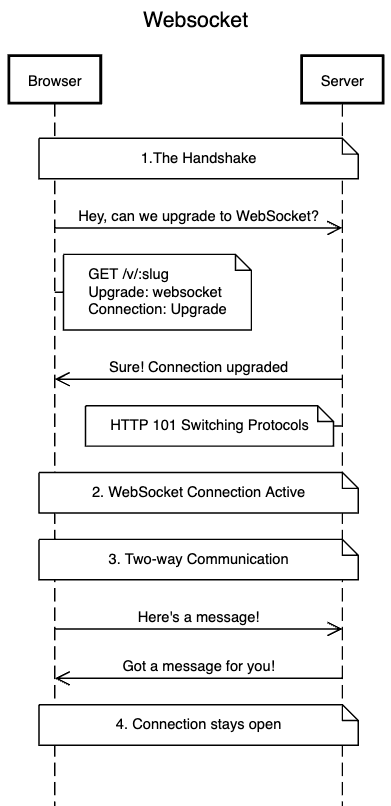
Let me show you how WebSocket works. It starts with something called a “handshake” - yes, just like when we meet someone new 😄

Here’s what’s happening:
- First Contact
- Your browser sends a special HTTP request to the server
- It’s like saying “Hey, I know we’re talking HTTP now, but can we switch to WebSocket?”
- This request includes special headers like
Upgrade: websocket
- Server Agreement
- If the server supports WebSocket, it replies “Sure, let’s switch!”
- The response has a special code: 101 (Switching Protocols)
- Now both sides upgrade their connection from HTTP to WebSocket
- The Open Line
- After the handshake, the connection stays open
- Both sides can send messages whenever they want
- Messages can be text or binary data
- Each message is called a “frame” in WebSocket terms
Why This is Cool
The WebSocket connection has some nice features:
- It’s full-duplex (both sides can talk at the same time)
- It has very little overhead (just a few extra bytes per message)
- It works through firewalls because it starts as a regular HTTP connection
- The connection stays alive as long as both sides want
Real World Example
Let’s look at some basic JavaScript code to use WebSocket:
// Opening a connection
const socket = new WebSocket('ws://example.com/socket');

// Sending a message
socket.send(JSON.stringify({
  type: 'chat',
  message: 'Hello!'
}));

// Receiving messages
socket.onmessage = function(event) {
  const message = JSON.parse(event.data);
  console.log('Got message:', message);
};

// Handling connection status
socket.onopen = function() {
  console.log('Connected!');
};

socket.onclose = function() {
  console.log('Connection closed');
};
No more polling! 🎉 When the server has new data, it just sends it through the open connection. This is perfect for:
- Chat applications
- Live sports scores
- Stock price updates
- Multiplayer games
If you’re curious about WebSocket in action, try opening your browser’s developer tools on a chat app like Slack or Discord. Look at the Network tab - you’ll spot these WebSocket connections doing their magic!
On a related note, I recently implemented WebSocket in my project called WebhookDump. It’s a simple tool that helps developers test and inspect webhook requests in real-time. If you’re interested, head over to webhookdump.link to check it out, or stay tuned for my next posts where I share my journey building it!
Happy coding! 🚀
